実験室のPCはインストールが許可されていないので、Potable版をUSBメモリにインストールします。
インストール先を F:\PortableGit と指定する。
Windows PowerShellを開く(windows左下の検索から探すなど)
> Set-Alias git F:\PortableGit\bin\git.exe (gitと打てばこれが実行されるように)
> git --version → 表示を確認
> git config --global user.name "xxx"
> git config --global user.email "yyy@zzz.jp" (最初に名前とメアドの設定が必須)
> mkdir xxx
> cd xxx
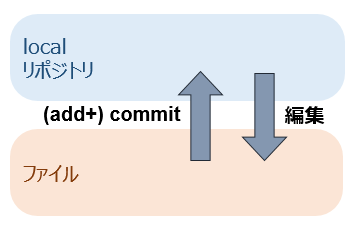
> git init (リポジトリ作成)
> git add yyy.txt (ファイルをリポジトリに登録)
> git commit yyy.txt --message "zzz" (変更をcommit)
> git log (ログを見る)
> git commit yyy.txt --message "ZZZ"
> git log
> git log
> git reset --hard xxxxxxxxxxxxxxxxxxxxxxxxxxxxxxxxxxxxxxxx (ログを見てどれか指定する)
注意:メールアドレスの確認があるので、すぐに受信できるメアドで登録すること
> $env:home = "F:" (今後の作業のために環境変数を一時的に変更)
> F:/PortableGit/usr/bin/ssh-keygen.exe (SSH用の鍵を作成。いろいろ聞いてくるが全てEnter)
F:/.ssh の下にできた公開鍵(id_rsa.pub)をGitHubに登録
(進む前にメアドの認証をしておくこと)
GitHubの右上の+(プラス) → New repository → リポジトリ名決めてcreate
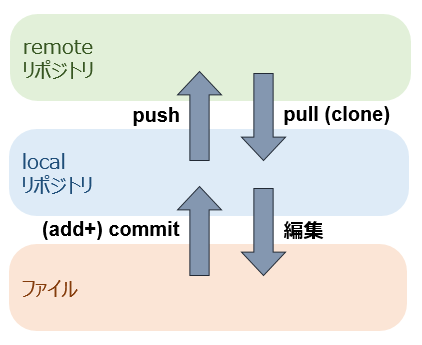
> git remote add origin git@github.com:xxx/yyy.git (xxx:ユーザ名,yyy:リポジトリ名)
> git push origin master
(are you sure と聞かれたら yes)
GitHubをリロードしてみるとファイルが見えるはず。
グループのリーダのみが行ってください
GitHubの右上の+(プラス) → New organization
グループのメンバーを登録する(全員にowner権限を与える)
グループの共用リポジトリを作成
> git remote add origin git@github.com:xxx/yyy.git (xxx:organization名,yyy:共用リポジトリ名)
(remote origin already exists と言われたら > git remote remove origin してから)
> git push origin master
GitHubに登録したメアドにorganizationへの招待確認メールが届くので承認する
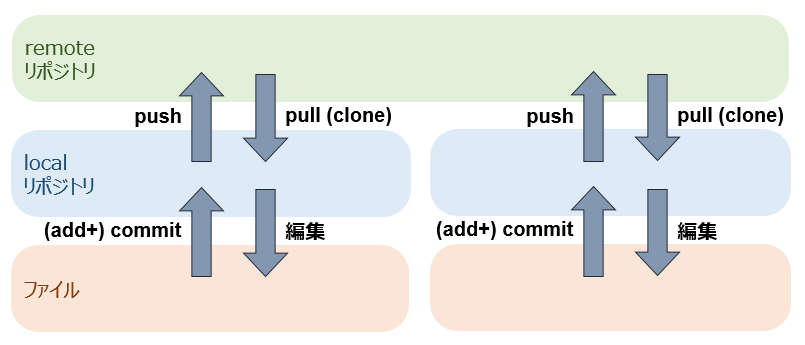
グループの共用リポジトリをcloneして今後の作業に備える
> git clone git@github.com:xxx/yyy.git
cloneしたリポジトリについてのpushは > git push だけでOK。(元リポジトリが分かっているので)